Elif Coding
  • Home
  • ANDROID STUDIO
    • FIREBASE
    • KOTLIN
    • FLUTTER
    • MATERIAL DESIGN FOR ANDROID
  • HOW TO( IN ANDROID STUDIO )
  • HTML AND CSS
  • YOUTUBE SUBSCRIBE
  • ABOUT US
    • PRIVACY POLICY
    • TERMS AND CONDITION
    • DISCLAIMER
  • CONTACT US
The disease arising in Wuhan-China,is the COVID-19 disease first known as the coronavirus disease (COVID–19). The "CO" is the corona disease and "VI" is the virus, and "D" the disease. This disease has historically been labeled as "novel 2019 coronavirus" or "2019-nCoV."

The COVID-19 is a new virus that has been linked with the same family of viruses, such as SARS and some common colds. Hence as part of raising awareness, in today's article, Elif Coding comes out with how to create COVID-19 walkthrough screen design in android studio.

covid-19

WHAT IS WALKTHROUGH SCREEN OR ONBOADING SCREEN? 

In modern times, the first time users display onboard screens has become a popular occurrence in mobile applications. The aim of these onboard displays also called "WALKTHROUGH SCREEN" is to introduce the application and demonstrate what it does. Since these are often the first set of screens to communicate with users, the users anticipate the app. 
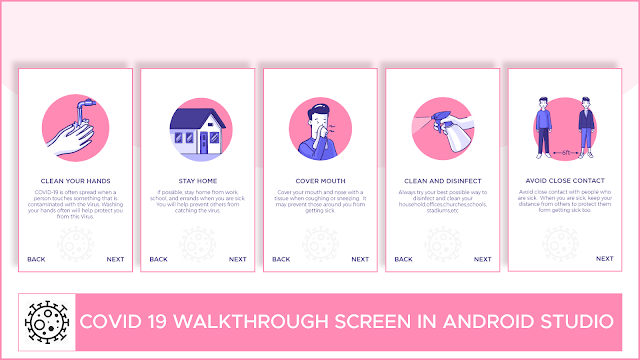
onboarding screen in covid-19


Those involved in product development,project managers, designers and developers must then take the time to decide if onboarding is required for the application, and, if so, to determine how to execute it best. 

adobe xd design free


XML LAYOUT DESIGN 

  • First Download XD design and Export the design as drawables
  • After exporting, import drawables to your android studio project as drawables.
  • Download Gotham and Monsterrat fonts.
  • Create Android Resource directory and paste downloaded font in that directory name font
  • create new android layout activity name slider_layout.
  • Copy and paste this xml code in the newly created slider_layout

slider_layout.xml
 
<?xml version="1.0" encoding="utf-8"?>
<androidx.constraintlayout.widget.ConstraintLayout xmlns:android="http://schemas.android.com/apk/res/android"
    xmlns:app="http://schemas.android.com/apk/res-auto"
    xmlns:tools="http://schemas.android.com/tools"
    android:layout_width="match_parent"
android:layout_height="match_parent">

    <ImageView
        android:id="@+id/imageView"
        android:layout_width="wrap_content"
        android:layout_height="wrap_content"
        android:layout_marginStart="8dp"
        android:layout_marginTop="90dp"
        android:layout_marginEnd="8dp"
        android:src="@drawable/s_distance_img"
        app:layout_constraintEnd_toEndOf="parent"
        app:layout_constraintStart_toStartOf="parent"
        app:layout_constraintTop_toTopOf="parent" />

    <TextView
        android:id="@+id/textView"
        android:layout_width="wrap_content"
        android:layout_height="wrap_content"
        android:layout_marginStart="8dp"
        android:layout_marginTop="32dp"
        android:layout_marginEnd="8dp"
        android:fontFamily="@font/gotham_medium"
        android:text="HEADING"
        android:textStyle="bold"
        android:textColor="#372B7B"
        android:textSize="20sp"
        app:layout_constraintEnd_toEndOf="parent"
        app:layout_constraintStart_toStartOf="parent"
        app:layout_constraintTop_toBottomOf="@+id/imageView" />

    <TextView
        android:id="@+id/description"
        android:layout_width="wrap_content"
        android:layout_height="wrap_content"
        android:layout_marginStart="8dp"
        android:layout_marginTop="8dp"
        android:layout_marginEnd="8dp"
        android:fontFamily="@font/montserrat"
        android:padding="10dp"
        android:text="Avoid close contact with people who are sick. When you are sick, keep your distance from others to protect them from getting sick too."
        android:gravity="center"
        android:textColor="#3A2F81"
        android:textSize="16sp"
        app:layout_constraintEnd_toEndOf="parent"
        app:layout_constraintStart_toStartOf="parent"
        app:layout_constraintTop_toBottomOf="@+id/textView" />

</androidx.constraintlayout.widget.ConstraintLayout>
  •  In the activity_main paste this xml code

activity_main.xml

<?xml version="1.0" encoding="utf-8"?>
<RelativeLayout xmlns:android="http://schemas.android.com/apk/res/android"
    xmlns:app="http://schemas.android.com/apk/res-auto"
    xmlns:tools="http://schemas.android.com/tools"
    android:layout_width="match_parent"
    android:layout_height="match_parent"
    android:background="@drawable/app_bg"
    android:orientation="vertical"
    tools:context=".MainActivity">

    <androidx.viewpager.widget.ViewPager
        android:id="@+id/viewpager"
        android:layout_width="match_parent"
        android:layout_height="match_parent"
        app:layout_constraintBottom_toBottomOf="parent"
        app:layout_constraintEnd_toEndOf="parent"
        app:layout_constraintStart_toStartOf="parent"
        app:layout_constraintTop_toTopOf="parent">

    </androidx.viewpager.widget.ViewPager>


    <TextView
        android:id="@+id/back"
        android:layout_width="wrap_content"
        android:layout_height="wrap_content"
        android:layout_alignParentStart="true"
        android:layout_alignParentBottom="true"
        android:layout_marginStart="20dp"
        android:layout_marginBottom="20dp"
        android:fontFamily="@font/gotham_medium"
        android:text="@string/back"
        android:textColor="#3A2F81"
        android:textSize="16sp"
        android:textStyle="bold" />


    <TextView
        android:id="@+id/next"
        android:layout_width="wrap_content"
        android:layout_height="wrap_content"
        android:layout_alignParentEnd="true"
        android:layout_alignParentBottom="true"
        android:layout_marginEnd="20dp"
        android:layout_marginBottom="20dp"
        android:fontFamily="@font/gotham_medium"
        android:text="@string/next"
        android:textColor="#3A2F81"
        android:textSize="16sp"
        android:textStyle="bold" />

</RelativeLayout>

  •  Create a new Java Class named SliderAdapter
  • Paste this java code in the newly created java class

 SliderAdapter.java 
package com.ayowainc.ob;

import android.content.Context;
import android.view.LayoutInflater;
import android.view.View;
import android.view.ViewGroup;
import android.widget.ImageView;
import android.widget.TextView;

import androidx.annotation.NonNull;
import androidx.constraintlayout.widget.ConstraintLayout;
import androidx.viewpager.widget.PagerAdapter;

public class SliderAdapter extends PagerAdapter {

    private Context context;

    SliderAdapter(Context context) {
        this.context = context;
    }

    //Arrays
    private int[]slider_images = {
            R.drawable.s_distance_img,
            R.drawable.wash_hands_img,
            R.drawable.stay_home_img,
            R.drawable.cover_mouth_img,
            R.drawable.disinfect_img,
            R.drawable.elif_logo
    };

    private String[]headings = {
            "AVOID CLOSE CONTACT", "CLEAN YOUR HANDS","STAY HOME","COVER MOUTH","CLEAN AND DISINFECT","INFO FROM ELIF"
    };

    private String[]descriptions = {
            "Avoid close contact with people who are sick.  When you are sick, keep your distance from others to protect them form getting sick too.",
            "COVID-19 is often spread when a person touches something that is contaminated with the Virus. Washing your hands often will help protect you from this Virus.",
            "If possible, stay home from work, school, and errands when you are sick.  You will help prevent others from catching the virus.",
            "Cover your mouth and nose with a tissue when coughing or sneezing.  It may prevent those around you from getting sick.",
            "Always try your best possible way to disinfect and clean your household,offices,churches,schools, stadiums,etc",
            "Hey! Viewers COVID-19 is real, let's come together and fight this noveal virus from our society. Please Stay Home, Stay Safe and Subscribe"
    };

    @Override
    public int getCount() {
        return headings.length;
    }

    @Override
    public boolean isViewFromObject(@NonNull View view, @NonNull Object object) {
        return view == (ConstraintLayout) object;
    }

    @NonNull
    @Override
    public Object instantiateItem(@NonNull ViewGroup container, int position) {
        LayoutInflater layoutInflater = (LayoutInflater) context.getSystemService(Context.LAYOUT_INFLATER_SERVICE);
        View view = layoutInflater.inflate(R.layout.activity_slide_layout, container, false);

        ImageView sliderImages = (ImageView) view.findViewById(R.id.imageView);
        TextView sliderHeading = (TextView)view.findViewById(R.id.textView);
        TextView sliderDesc = (TextView) view.findViewById(R.id.description);

        sliderImages.setImageResource(slider_images[position]);
        sliderHeading.setText(headings[position]);
        sliderDesc.setText(descriptions[position]);

        container.addView(view);
        return view;

    }

    @Override
    public void destroyItem(@NonNull ViewGroup container, int position, @NonNull Object object) {
        container.removeView((ConstraintLayout)object);
    }
}


  •  In the MainActivity.java paste this line of code

 MainActivity.java

package com.ayowainc.ob;

import android.os.Bundle;
import android.view.View;
import android.view.WindowManager;
import android.widget.TextView;

import androidx.appcompat.app.AppCompatActivity;
import androidx.viewpager.widget.ViewPager;

public class MainActivity extends AppCompatActivity {
    private ViewPager slideViewPager;
    private TextView Next, Back;

    @Override
    protected void onCreate(Bundle savedInstanceState) {
        getWindow().setFlags(WindowManager.LayoutParams.FLAG_FULLSCREEN, WindowManager.LayoutParams.FLAG_FULLSCREEN);
        super.onCreate(savedInstanceState);
        setContentView(R.layout.activity_main);

        slideViewPager = (ViewPager) findViewById(R.id.viewpager);
        Next = findViewById(R.id.next);
        Back = findViewById(R.id.back);
        Back.setVisibility(View.INVISIBLE);

        SliderAdapter sliderAdapter = new SliderAdapter(this);
        slideViewPager.setAdapter(sliderAdapter);

        Next.setOnClickListener(new View.OnClickListener() {

            @Override
            public void onClick(View view) {
                slideViewPager.setCurrentItem(slideViewPager.getCurrentItem() + 1, true);
            }
        });


        Back.setOnClickListener(new View.OnClickListener() {

            @Override
            public void onClick(View view) {
                slideViewPager.setCurrentItem(slideViewPager.getCurrentItem() - 1, true);
            }
        });

        slideViewPager.addOnPageChangeListener(new ViewPager.OnPageChangeListener() {
            private int i;
            private float v;
            private int i1;

            @Override
            public void onPageScrolled(int i, float v, int i1) {

                this.i = i;
                this.v = v;
                this.i1 = i1;
            }

            @Override
            public void onPageSelected(int position) {
                if (position == 0) {
                    Back.setVisibility(View.INVISIBLE);
                } else {
                    Back.setVisibility(View.VISIBLE);
                }
                if (position < slideViewPager.getAdapter().getCount() - 1) {
                    Next.setVisibility(View.VISIBLE);
                } else {
                    Next.setVisibility(View.INVISIBLE);
                }
            }

            @Override
            public void onPageScrollStateChanged(int i) {

                this.i = i;
            }
        });
    }


}


covid-19 summary

Run the code and see the outcome. Hey! Viewers COVID-19 is real, let's come together and fight this novel virus from our society. Please Stay Home, Stay Safe and Subscribe to my youtube channel.


https://www.youtube.com/watch?v=GsqxDW8vde8 
download free android studio source code
Before I speak about the subject today. We'll look forward to other ways to answer questions and to learning how to use the AndroidX constraint layout. This article teaches you how to make Android Studio apps with constraint layout support all your screen sizes.


Make Android Studio app support all screen sizes with Constraint Layout.

  • How to set the layout of the screen to support any screen size?
  • Make an android app in Android studio responsive?
  • How to create android applications that fit all screen sizes?
  • Design Android layout for various screen sizes?

So in this tutorial you will find the answer to all the questions above and related. We will use Constraint, which is a screen layout in Android studio to support all the screen sizes.

What is an Android Studio Constraint Layout?

Constraint layout is a Group view, including all the other views inside to create an app for android. Constraint layout uses constraints for placing views anywhere on the screen. It is flexible and easier to use in Android studio compared to other layouts.


What is an Android Studio Constraint Layout?


The constraint layout is one of the recent updates of the Android Studio for the design of an application. We will create a responsive layout in the Android studio in our present tutorial with a constraint layout and some of the key problems in the use of this layout

About AndroidX Constraint Layout.

AndroidX is a big improvement to Android support libraries, which are no longer maintained by the android studio where Constraint layout once was part of and published in support libraries.

ConstraintLayout, which is now the default Android Studio layout, allows you to set objects in many places.

You may limit them to each other's container or guidelines. In a flat hierarchy this enables you to create large , complex and dynamic views.

How do I make Android in Android Studio responsive?

In this article you will learn how to create a responsive design using the constraint layout of Android Studio.

  • Build a new Project
  • Move to the XML and choose a constraintLayout as the xml design parent.
  • Type Capital V for Views
  • Set them to test the size of the screen
  • Set all the constraint on it closest neighbours
  • Adjust the width to match constraint in the XML design panel for horizontal responsiveness.
  • Height to match constraint, if vertical responsive is needed.
  • Make sure all the constraints are set.
  • Run the project in Android studio and it will respond to all types of screen sizes.

How do I make Android in Android Studio responsive?

Make Android Application Responsive with this code using Constraint Layout

  • Open XML(activity_main.xml)
  • Remove what's there ever
  • Copy the following code
  • Paste code in activity_main.xml
  • Execute or run project

XML CODE

<?xml version="1.0" encoding="utf-8"?>
<androidx.constraintlayout.widget.ConstraintLayout xmlns:android="http://schemas.android.com/apk/res/android"
    xmlns:app="http://schemas.android.com/apk/res-auto"
    xmlns:tools="http://schemas.android.com/tools"
    android:layout_width="match_parent"
    android:layout_height="match_parent"
    tools:context=".MainActivity">

    <!--first view-->
    <View
        android:id="@+id/elif12"
        android:layout_width="0dp"
        android:layout_height="0dp"
        android:background="#FB8C00"
        app:layout_constraintBottom_toBottomOf="parent"
        app:layout_constraintEnd_toEndOf="parent"
        app:layout_constraintStart_toEndOf="@+id/elif9"
        app:layout_constraintTop_toBottomOf="@+id/elif4"
        />
    <!--second view-->
    <View
        android:id="@+id/elif11"
        android:layout_width="0dp"
        android:layout_height="0dp"
        android:background="#FFE92B"
        app:layout_constraintBottom_toBottomOf="parent"
        app:layout_constraintEnd_toStartOf="@+id/elif10"
        app:layout_constraintStart_toStartOf="parent"
        app:layout_constraintTop_toBottomOf="@+id/elif2"
        />
    <!--third view-->
    <View
        android:id="@+id/elif10"
        android:layout_width="0dp"
        android:layout_height="0dp"
        android:background="#0B0901"
        app:layout_constraintBottom_toBottomOf="parent"
        app:layout_constraintEnd_toStartOf="@+id/elif9"
        app:layout_constraintStart_toEndOf="@+id/elif11"
        app:layout_constraintTop_toBottomOf="@+id/elif2"
        />
    <!--fourth view-->
    <View
        android:id="@+id/elif4"
        android:layout_width="0dp"
        android:layout_height="0dp"
        android:layout_marginTop="200dp"
        android:background="#5F0DE1"
        app:layout_constraintBottom_toTopOf="@+id/elif12"
        app:layout_constraintEnd_toEndOf="parent"
        app:layout_constraintHorizontal_bias="1.0"
        app:layout_constraintStart_toEndOf="@+id/elif2"
        app:layout_constraintTop_toTopOf="parent"
        />
    <!--fifth view-->
    <View
        android:id="@+id/elif3"
        android:layout_width="0dp"
        android:layout_height="0dp"
        android:background="#140533"
        app:layout_constraintBottom_toTopOf="@+id/elif4"
        app:layout_constraintEnd_toEndOf="parent"
        app:layout_constraintStart_toEndOf="@+id/elif2"
        app:layout_constraintTop_toTopOf="parent"
        />
    <!--sixth view-->
    <View
        android:id="@+id/elif2"
        android:layout_width="0dp"
        android:layout_height="0dp"
        android:background="#0DF17D"
        app:layout_constraintBottom_toTopOf="@+id/elif11"
        app:layout_constraintEnd_toStartOf="@+id/elif3"
        app:layout_constraintStart_toStartOf="parent"
        app:layout_constraintTop_toTopOf="parent"
        />
    <!--seventh view-->
    <View
        android:id="@+id/elif9"
        android:layout_width="0dp"
        android:layout_height="0dp"
        android:background="#FF0048"
        app:layout_constraintBottom_toBottomOf="parent"
        app:layout_constraintEnd_toStartOf="@+id/elif12"
        app:layout_constraintStart_toEndOf="@+id/elif10"
        app:layout_constraintTop_toBottomOf="@+id/elif4"
        />
</androidx.constraintlayout.widget.ConstraintLayout>


Elif coding all articles summary

However, AndroidX has now replaced the constraint layout and is not supported by the support libraries of android. Now and then use AndroidX to create your projects and try to turn your previous projects into AndroidX.
We have several plugins available in Android Studio, one of them is Android wifi ADB

I guess when you use usb cable to connect to your Android device, you get irritated. Isn't it such a hobby when you have to plug the usb cable in your system?

This article teaches you how to use WiFi to connect your Android device to the Android Studio.


use WiFi to connect your Android device to the Android Studio


 How to setup Android WiFi ADB plugin in Android Studio.

Setting up Android WiFi ADB plugin in Android Studio involves just three steps and they are as follow; 

Phase 1:

In your new android studio project Go to File>Settings


 How to setup Android WiFi ADB plugin in Android Studio.

 Phase 2:

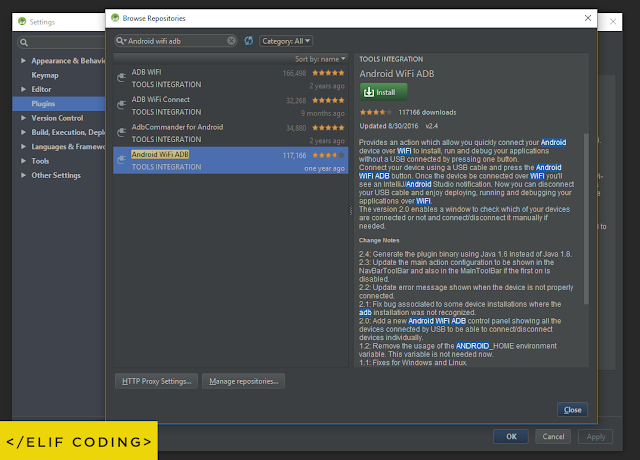
In the Settings page go to Plugins and Browse the repository and Search Android Wifi ADB and install it.


How to setup Android WiFi ADB plugin in Android Studio.


 Final Phase:

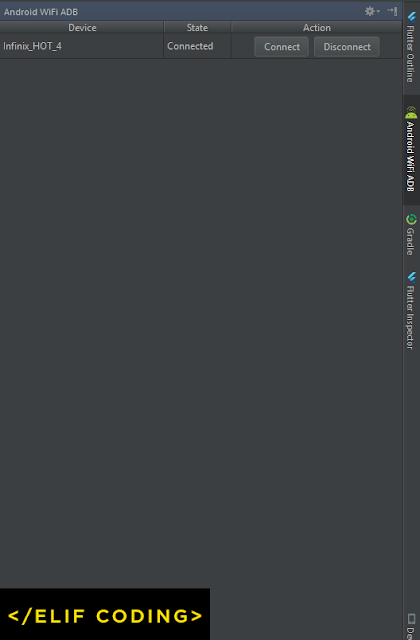
After Plugin is installed, restart your Android Studio and you can see the Android wifi ADB section on the right side. Now just plug in on your Android device and press the Connect button.

Simply plug in your Android device and press the connect button. You can now do your testing by wireless Internet access or WiFi.


 How to setup Android WiFi ADB plugin in Android Studio.


How to use WiFi to connect your Android device to the Android Studio
 That's what you did:) no cable needed any longer.

I hope this is a helpful article. If something is missing, questions or feedback, go ahead and leave a comment below. I would enjoy the feedback.


How to use WiFi to connect your Android device to the Android Studio

Android is a mobile platform that is among the most common. Android Studio allows developers to write Java code for Android management and control. Google developed Android Studio IDE. This IDE is intended to build applications for Android platforms.

Please note that Android Studio replaces the popular Eclipse as the preferred IDE for developing Android applications. This article describes how Android Studio can be used as a beginner.


Introduction to Android Studio for beginners.


What is Android Studio?

Android Studio is the official integrated Google Android development environment. It's developed from IntelliJ IDEA software by JetBrains and specifically designed for Android development. 

This is available for installation on operating systems such as Windows , Mac OS and Linux.
The software was initially unveiled at Google I / O in May 2013 and in December 2014, the first stable build was released.

What programming language is used in Android Studio?

The foundation for everyone in Android Studio to program is only two languages and not necessarily complete their studies.

  • Java
  • XML(Extensibe Markup Language)

Java is for simple features and controls, and XML concerns the user interface(Activity). Google offers pallets in Android Studio, where it is all about dragging and dropping to create your interface.

You just need to know how to allocate a piece of code to any palette, through tag or ID etc.

How to install Android Studio.

  • On Windows
  1. Download Android Studio here
  2. After download is done. Double click on the .exe file and launch.
  3. Follow the Android Studio Setup Wizard and install any required SDK packages.
  • On Mac
  1. Download Android Studio here
  2. After download is done. Double click on the DMG file and launch.
  3. Drag Android Studio to the application folder and launch Android Studio.
  4. You are directed by the Android Studio Setup Wizard through the rest of your setup, including the installation and creation of Android SDK components.

Create your first project in Android Studio.


Create your first project in Android Studio.


It is simple for Android developers to build Android apps for various form factors, including handsets, laptops, television and wearing devices. This page demonstrates how to start or import an existing Android app project.

If you have not opened a project, you will see the welcome screen if you first open Android Studio, which allows you to create a new project by clicking Start a new Android Studio project.

You can start developing a project by selecting File > New > New  Project from the main menu when you open a document.

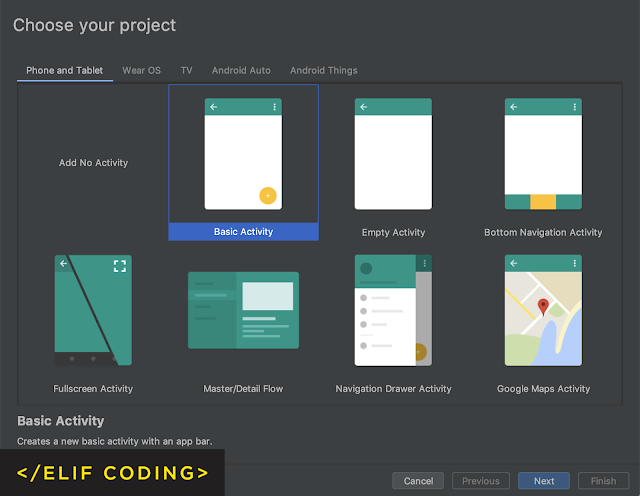
Then you can see the New Project Guide, which helps you to select the type of project that you want to build and adds code and tools to get you started. You can find a new project with the help of a New Project Wizard.

  • Select your project page
You can choose from Product Form Factor types that are shown in tabs next to the top of the wizard in the Choose Project Section. 


Choose your project in android studio


Android Studio can start with the sampling codes and resources by selecting the type of a project you want to build. 

Select Next after making a pick.

  • Setup your project page


  1. Enter your project name.
  2. Enter the name of the package. The package name is also your program ID, which you will be able to modify later by default.
  3. Please specify the location to save your project locally.
  4. When generating sample code for your new project, select the language that you want Android Studio to use. Bear in mind, you don't just use the project 's development language.
  5. Choose your app's Minimum API level to support. You can rely on fewer modern Android APIs when you select a low API level. A larger share of Android devices will run your app, however. On the other hand the higher API level is selected.
  6. If you'd like to use AndroidX libraries, which boost replacements for Android Support libraries, by default, please check the box next to Using AndroidX artifacts.
  7. If your project is ready, click Finish

Conclusion

With some basic code and resources, Android Studio creates a new project to get you started. Later on, you can add a module to your project if you decide to add support for a different device form factor. And you can do this by building a library of Android if you want to share code and resources between modules.

Read the project summary for more detail on the Android framework and module types. If you're new to Android, begin with Getting Started on Android.
Older Posts Home

POPULAR POSTS

  • Get started with Flutter in Android Studio 2020 (Complete Guide)
  • Make Android Studio App Support All Screen Sizes With Constraint Layout [Full Guide].
  • How to use WiFi to connect your Android device to the Android Studio [Full Guide].
  • HTML and CSS made easy with these 3 (Free) Tools
Powered by Blogger.
ad-here

Labels

FLUTTER FREEMIUM SOURCE CODE HOW TO IN ANDROID STUDIO HTML AND CSS MATERIAL DESIGN FOR ANDROID

Translate

ADVERTISE HERE

ad-here

PURCHASE SOURCE CODE

codecanyon-img

YOUTUBE CHANNEL SUBSCRIBE

subscribe-img

Designed By Elif Coding | Distributed By AYOWA INC