Android is a mobile platform that is among the most common. Android Studio allows developers to write Java code for Android management and control. Google developed Android Studio IDE. This IDE is intended to build applications for Android platforms.
Please note that Android Studio replaces the popular Eclipse as the preferred IDE for developing Android applications. This article describes how Android Studio can be used as a beginner.

Java is for simple features and controls, and XML concerns the user interface(Activity). Google offers pallets in Android Studio, where it is all about dragging and dropping to create your interface.
You just need to know how to allocate a piece of code to any palette, through tag or ID etc.


Please note that Android Studio replaces the popular Eclipse as the preferred IDE for developing Android applications. This article describes how Android Studio can be used as a beginner.

What is Android Studio?
Android Studio is the official integrated Google Android development environment. It's developed from IntelliJ IDEA software by JetBrains and specifically designed for Android development.
This is available for installation on operating systems such as Windows , Mac OS and Linux.
The software was initially unveiled at Google I / O in May 2013 and in December 2014, the first stable build was released.
What programming language is used in Android Studio?
The foundation for everyone in Android Studio to program is only two languages and not necessarily complete their studies.- Java
- XML(Extensibe Markup Language)
You just need to know how to allocate a piece of code to any palette, through tag or ID etc.
How to install Android Studio.
- On Windows
- Download Android Studio here
- After download is done. Double click on the .exe file and launch.
- Follow the Android Studio Setup Wizard and install any required SDK packages.
- On Mac
- Download Android Studio here
- After download is done. Double click on the DMG file and launch.
- Drag Android Studio to the application folder and launch Android Studio.
- You are directed by the Android Studio Setup Wizard through the rest of your setup, including the installation and creation of Android SDK components.
Create your first project in Android Studio.

It is simple for Android developers to build Android apps for various form factors, including handsets, laptops, television and wearing devices. This page demonstrates how to start or import an existing Android app project.
If you have not opened a project, you will see the welcome screen if you first open Android Studio, which allows you to create a new project by clicking Start a new Android Studio project.
You can start developing a project by selecting File > New > New Project from the main menu when you open a document.
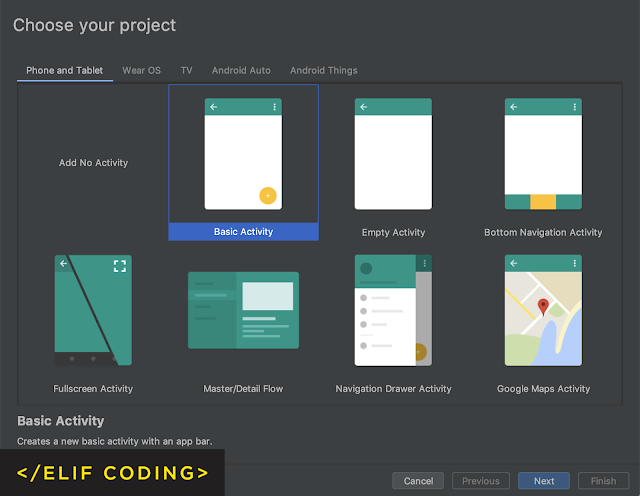
Then you can see the New Project Guide, which helps you to select the type of project that you want to build and adds code and tools to get you started. You can find a new project with the help of a New Project Wizard.
- Select your project page
You can choose from Product Form Factor types that are shown in tabs next to the top of the wizard in the Choose Project Section.

Android Studio can start with the sampling codes and resources by selecting the type of a project you want to build.
Select Next after making a pick.
- Setup your project page
- Enter your project name.
- Enter the name of the package. The package name is also your program ID, which you will be able to modify later by default.
- Please specify the location to save your project locally.
- When generating sample code for your new project, select the language that you want Android Studio to use. Bear in mind, you don't just use the project 's development language.
- Choose your app's Minimum API level to support. You can rely on fewer modern Android APIs when you select a low API level. A larger share of Android devices will run your app, however. On the other hand the higher API level is selected.
- If you'd like to use AndroidX libraries, which boost replacements for Android Support libraries, by default, please check the box next to Using AndroidX artifacts.
- If your project is ready, click Finish
Conclusion
With some basic code and resources, Android Studio creates a new project to get you started. Later on, you can add a module to your project if you decide to add support for a different device form factor. And you can do this by building a library of Android if you want to share code and resources between modules.
Read the project summary for more detail on the Android framework and module types. If you're new to Android, begin with Getting Started on Android.


0 comments